

Appearance
Colour effects
This page shows you how to animate light with five effects: Reveal, Fade, Pulse, Chase and Shine. An effect changes how the colour beneath it looks over time. A wipe, a fade or a running light is an effect.
These are not the same as Motion effects, which move a formation on the Effects channel. The clips on this page live on a Colors channel.
| Effect | What you see |
|---|---|
| Reveal | A wipe that sweeps the colour into view, or out of view. |
| Fade | The whole selection brightens or dims over the clip. |
| Pulse | The brightness breathes up and down. |
| Chase | A bright band runs along the drones. |
| Shine | A bright glint crosses the shape. Outside the band nothing changes. |
Add an effect
- Select the element in the Hierarchy panel. It needs a Colors channel, see Colours.
- Right-click the Colors lane at the time the effect should start.
- Choose Add Reveal, Add Fade, Add Pulse, Add Chase or Add Shine.
- Click the clip and set it up in the Properties panel.
The Effects row
A channel that holds an effect grows a thin row above its colours, so the effect reads as acting on top of them. Effects sit in that row, and colours such as Solid sit in the main row beneath.
- A colour source cannot overlap another source on the same channel.
- An effect cannot overlap another effect on the same channel.
- An effect can overlap sources on the same channel. This is how you put a pulse on a Solid.
Links between effects and sources
A colour source is a Solid, Gradient, Sparks or Adjust clip. When an effect overlaps a source on its own channel by at least 0.25 s and 10% of its length, the app links them:
- The source is ticked under Colour sources in the effect's settings.
- The effect is trimmed so it stays inside the sources it covers.
- A small link badge shows on both clips. Select one and the other is highlighted.
This check runs each time you add, move or resize a clip on that channel. It replaces the ticks on an effect that overlaps sources. An effect that overlaps no source on its channel keeps its ticks.
What an effect does with its sources
The Colour sources list shows every source clip on the same element.
- None ticked: Reveal, Fade, Pulse and Chase dim the colours beneath. Shine paints its own colour.
- One or more ticked: the effect lays the colour of those sources over whatever is beneath, as strongly as the effect is bright at that moment. It uses the Blend setting. For Shine, a ticked source with Paint drones off replaces the Shine colour.
Blend appears once a source is ticked.
| Blend | Result |
|---|---|
| Normal (replace) | The source colour replaces what is beneath. If the source already paints those drones, the effect works on it instead (see below). The default. |
| Screen (brighten) | Adds light, staying smooth near full brightness. |
| Add | Adds light more strongly. |
| Multiply (dim) | Dims what is beneath and ignores the source colour. |
An effect over a painted colour
When you drop an effect over a colour clip in the same channel, it links to that colour. With Normal (replace), the effect then works on the colour it sits on:
- Reveal, Fade, Pulse and Chase show and hide the colour. At their dark moments you see whatever the colour covers, which is black on a dark drone.
- Shine lays its own Shine colour over the colour.
A Pulse linked to a red Solid pulses between off and red. To lay a different colour over the one beneath, use a source with Paint drones off.
Palette sources
A palette source is a source clip with Paint drones turned off. It shows Palette only in its settings and paints nothing itself. It exists to give an effect its colours, and it carries a palette tag in the Colour sources list.
A source only feeds an effect while the source's clip is running, and only on the slots it covers. So make the palette clip at least as long as the effect, and give it the slots the effect should colour.
Example: wipe in a three-colour flag
Sources cannot overlap on one channel, so each colour gets its own lane.
- Add three Colors channels to the formation, and one more on top for the effect.
- Add a Solid on each of the three lower lanes, covering the same time.
- Give each Solid its colour, and use Pick slots to select its stripe.
- Turn off Paint drones on all three.
- Add a Reveal of the same length on the top lane. Under Colour sources, tick all three Solids.
- Drag Start and End across the flag.
Each drone now lights in its own stripe's colour as the wipe passes, and stays lit until the clip ends.
Reveal
The Reveal settings look like this:
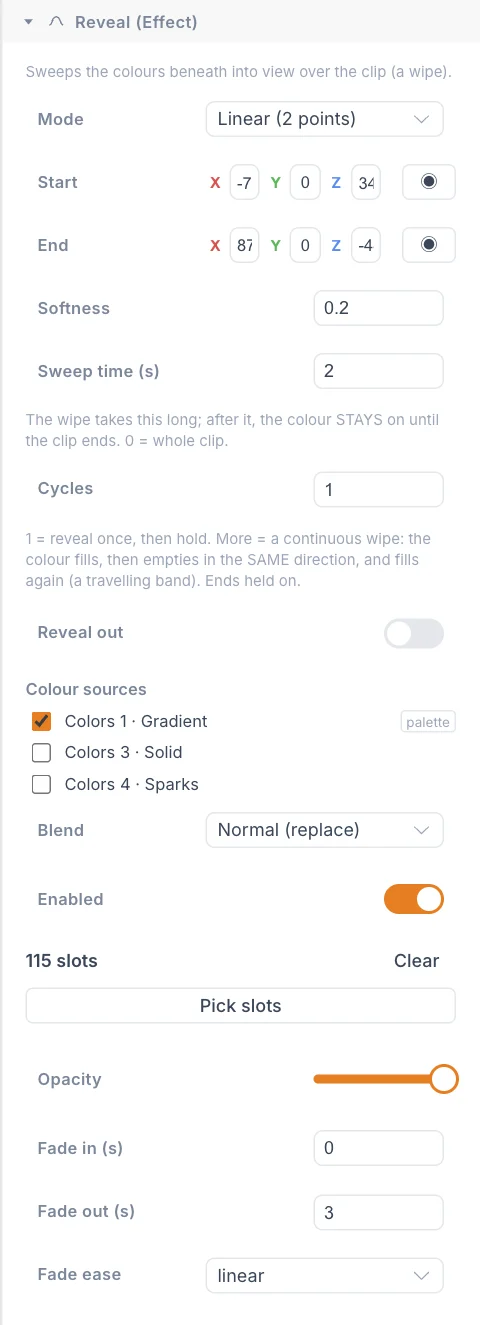
| Setting | What it does | Default |
|---|---|---|
| Mode | Linear (2 points): the wipe runs along a line. Radial (from centre): it spreads from a point. By selection order: it follows the order of the selected slots. | Linear (2 points) |
| Start, End | Ends of the line, in metres. Use ◉ to drag them in the viewport. | (-10, 0, 0) and (10, 0, 0) |
| Centre, Radius (m) | Middle and size of a radial wipe. | (-10, 0, 0) and 10 |
| Softness | Width of the wipe's soft edge, 0 to 1. 0 is a hard edge. | 0.15 |
| Sweep time (s) | How long the wipe takes. After it, the colour stays on until the clip ends. 0 uses the whole clip. | 2 |
| Cycles | 1 reveals once and holds. More makes a continuous wipe: the colour fills, empties in the same direction and fills again, then ends held on. 1 to 50. | 1 |
| Cycles overlap | Shown when Cycles is above 1. 0 fills fully, then empties. Higher values narrow the lit band. 1 is a thin chasing band. | 0 |
| Reveal out | Reverses the wipe, from lit to dark. With Cycles above 1, it makes a travelling dark band and ends held dark. | Off |
The timeline marks each fill and empty on the clip, and shades the final hold.
A one-by-one reveal
In By selection order mode, the order you click slots is the order they light.
- Set Mode to By selection order.
- Click Clear, because a new clip starts with every slot selected.
- Click Pick slots and click the slots one at a time. Clicking a slot again removes it, and a Shift box adds a whole region.
- Click Done picking.
- Click Append remaining N slots (reveal last), where N is the count, so the other slots light last. Slots outside the selection are not touched by the effect and stay lit.
Reset to element order returns to the element's own numbering.
Fade
| Setting | What it does | Default |
|---|---|---|
| Mode | In (appear), Out (disappear) or In then out, over the whole clip. | In (appear) |
| Ease | The shape of the ramp. Linear is a straight ramp, Ease in starts slowly, Ease out ends slowly, and Ease in-out does both. | Linear |
Pulse
| Setting | What it does | Default |
|---|---|---|
| Rate (/s) | Breaths per second. Minimum 0.05. | 1 |
| Min | Brightness at the lowest point, 0 to 1. 0 goes fully dark. | 0 |
| Phase | Shifts the start of the breath, 0 to 1. | 0 |
To stay in time with music at a given tempo, set Rate (/s) to beats per minute divided by 60.
Chase
The band runs along the slots in the order they are selected.
| Setting | What it does | Default |
|---|---|---|
| Speed (/s) | Full passes along the selection per second. | 0.5 |
| Width | Size of the band as a share of the selection, 0.02 to 1. | 0.25 |
| Pattern | Shape of the band: Sine (smooth), Triangle, Square (hard) or Saw. | Sine (smooth) |
| Min | Brightness outside the band, 0 to 1. 0 is fully dark. | 0 |
| Reverse | Runs the band the other way. | Off |
Shine
Shine brightens instead of dims. After the last pass it is gone, with no hold.
| Setting | What it does | Default |
|---|---|---|
| Mode | Linear (2 points) or Radial (from centre), which expands a ring. | Linear (2 points) |
| Start, End | Ends of the sweep, in metres. | (-10, 0, 0) and (10, 0, 0) |
| Angle (°) | Tilts the band into a diagonal ray, -80 to 80. Linear mode only. | 30 |
| Centre, Radius (m) | Middle and size of the ring. Radial mode only. | (-10, 0, 0) and 10 |
| Spread | Band thickness as a share of the sweep, 0.02 to 1. Small is a sharp glint, large is a broad wash. | 0.25 |
| Shine colour | The colour of the band. | White |
| Blend | Replace (show the colour) shows the colour as picked. Screen (additive light) and Add (hard glow) mix it with the colour beneath like light, so yellow over blue washes to white. | Replace (show the colour) |
| Sweep time (s) | How long one pass takes. 0 divides the clip evenly over the cycles. | 0 |
| Cycles | Number of passes, 1 to 50. | 1 |
| Reverse | Sweeps from End to Start. | Off |
Shared settings
Every effect also has Enabled, Pick slots, Opacity, Fade in (s), Fade out (s) and Fade ease, as described in Colours.
This reel from the night example shows what these tools can do:
Tips
- Check the selection first. An effect only touches the slots it covers.
- Give points a long reach. The default Start and End are 20 m apart, which is small for most formations.
- Keep a Chase or Pulse slow on large formations. Fast flicker is hard to read from the ground.
Next
Recolour what is already there with the Colours Manipulator.