

Appearance
Mesh
On this page you will upload a 3D model and turn it into a formation with exactly the number of drones you choose, evenly spaced.
A mesh is a 3D model stored as many small triangles. The Mesh element spreads slots over that model. A slot is one point of a shape that a drone will fly to. You choose how many slots you want, and the app finds where they go, so the model's own triangles do not decide the spacing.
Use a Mesh for 3D objects that you cannot build from shapes or text, such as a statue, a vehicle or a product.
Upload a mesh
- Open the Add menu and choose Mesh… in the Shapes group.
- Pick your file.
- Wait while the app works. The Spacing section shows
Sampling…with a progress bar. This can take a few seconds.
The new element is named after the file and sits in the Show. It starts with one slot per drone in your fleet, or 50 if the show has no Launch Pad yet. Its Size (m) is chosen for you, so those drones clear your Min separation (m).
| File type | Notes |
|---|---|
OBJ (.obj) | |
STL (.stl) | Up axis starts on Z. |
PLY (.ply) | Up axis starts on Z. |
GLB (.glb) | The best choice for glTF models, because it is one file. |
glTF (.gltf) | Must be self-contained. If its data sits in separate files, export it as a single .glb. |
FBX (.fbx) |
Only the shape is read. Materials, textures and animation in the file are ignored, and every part of the model joins one mesh. Holes, overlapping parts and flipped faces are fine for Surface fill, so you do not need to clean the model first.
The model appears centred on the element, with its lowest point on the element's base. While the element is selected, you see it as a see-through ghost behind the slots.
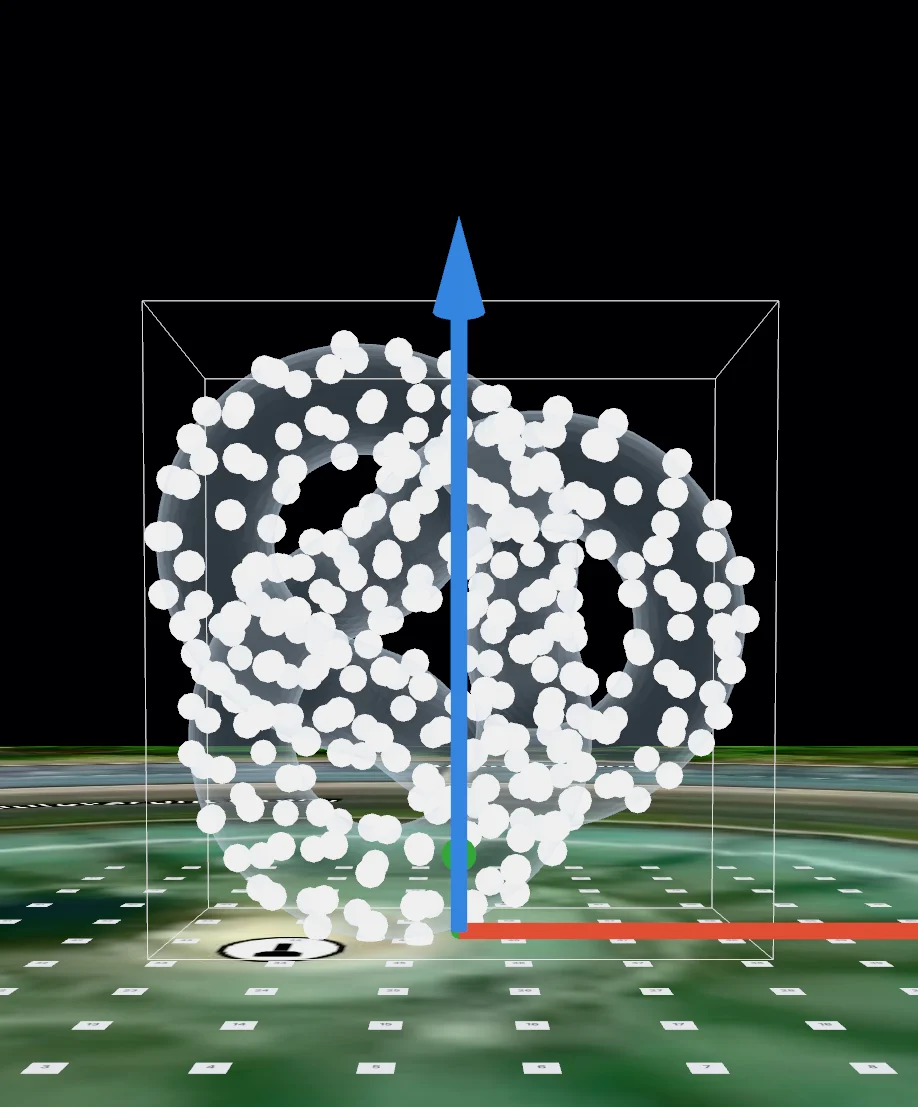
Mesh settings
Select the element to see its settings in the Properties panel.
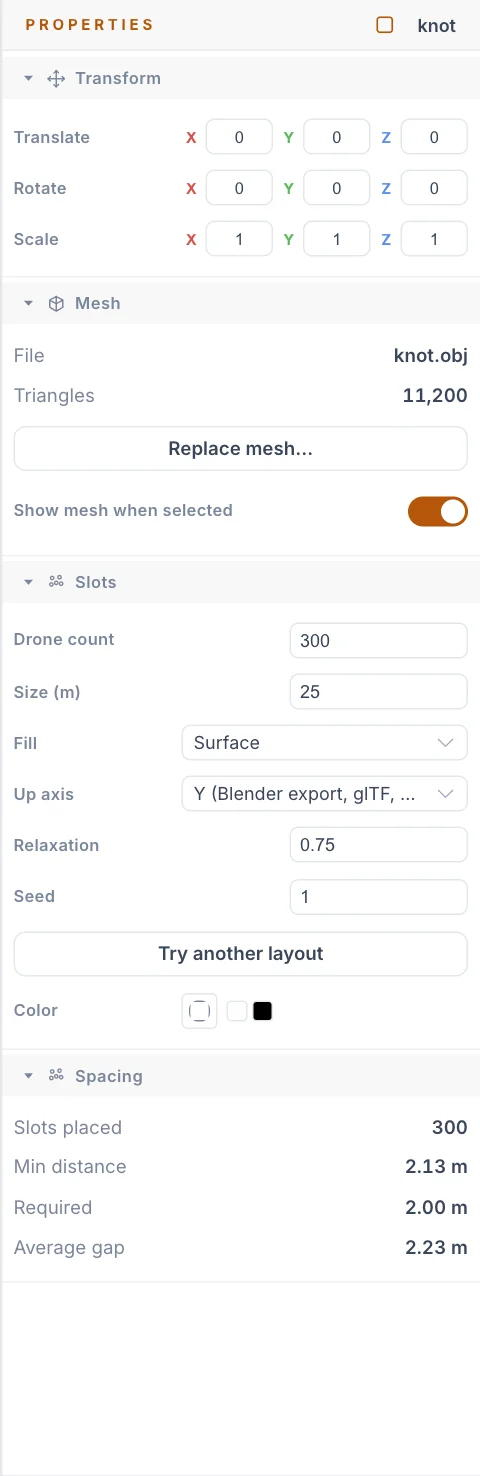
The Mesh section is about the file:
| Item | What it does | Default |
|---|---|---|
| File | A read-out of the uploaded file's name. | |
| Triangles | A read-out of the number of triangles in the file. | |
| Replace mesh… | Swaps in another file. See Replace the file. | |
| Show mesh when selected | Shows the ghost while the element is selected. It never appears in the show. | On |
The Slots section decides where the slots go:
| Setting | What it does | Default |
|---|---|---|
| Drone count | Number of slots. You always get exactly this many. Minimum 1. | Fleet size |
| Size (m) | The model's largest dimension. Minimum 1. | Worked out for you |
| Fill | Surface or Volume. See Surface or Volume. | Surface |
| Up axis | Which axis of the file points up. See Up axis. | Depends on the file |
| Relaxation | How long the app works on evening out the spacing, from 0 to 1. Higher is more even but slower. | 0.75 |
| Seed | Starts a different random layout. The same file and settings with the same seed always give the same layout. Minimum 1. | 1 |
| Try another layout | Adds 1 to Seed. | |
| Edit points | Lets you move, add and delete drones by hand. See Edit points. | |
| Color | Base colour. | Black |
Each change starts a new sample. The fields show your new values straight away, and the slots move when the sample finishes. If you change something else while it runs, the app starts again with the latest values. One finished sample is one step in Undo.
A black element is dark in the sky. Light it with colour clips.
Surface or Volume
- Surface puts drones on the skin of the model. The middle stays empty. This reads best for most models, because the audience sees the outline and the form.
- Volume fills the inside. It needs a closed model. If the model has holes, you see
This mesh encloses no solid volume. Close its holes, or use Surface fill.
Up axis
Different programs disagree on which axis points up. If your model lies on its side, change this setting.
| Choice | Use it for | Starts here for |
|---|---|---|
| Y | Most 3D modelling tools, glTF, OBJ | OBJ, GLB, glTF, FBX |
| Z | CAD models, STL | STL, PLY |
The Spacing section
This section tells you if the formation is safe to fly at its current size.
| Item | What it shows |
|---|---|
| Slots placed | The number of slots the element holds now. |
| Min distance | The closest two slots, as flown. It includes the Scale of the element, its groups and the Show at the current playhead time. It turns red when it is below Required. |
| Required | Min separation (m) from your Launch Pad. With several pads, it reads the first. With no pad it shows 0.00 m and no warning appears. |
| Average gap | The typical distance from a slot to its nearest neighbour, at the element's own Size (m). |
Distances are measured in a straight line through the air, not along the skin of the model. Two sides of a thin wing are neighbours even if the path round the edge is long, so thin models need more room than their surface area suggests.
When the drones do not fit
If Min distance is below Required, a red message tells you how many drones do not fit, and offers two fixes.
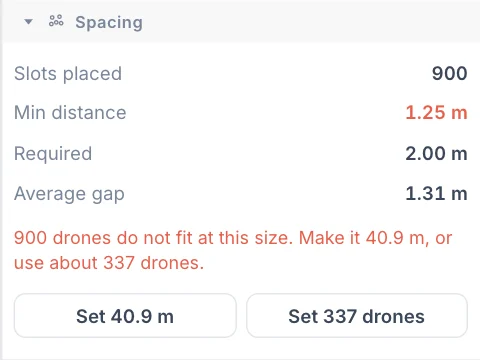
- Choose a fix:
- Set with a size in metres makes the model bigger and keeps every drone. Use this when you need all your drones in the shape.
- Set with a drone count keeps the size and uses fewer drones. Use this when the model must stay at its size.
- Wait for the new sample.
- Read Min distance again. The suggestions are estimates, so check that the warning has gone.
If you are only a little short, you can also try these:
- Raise Relaxation.
- Click Try another layout a few times.
Room grows quickly with size. Doubling Size (m) gives room for about four times the drones on Surface, and about eight times in Volume.
Check the whole group
Min distance covers this element only. If the group holds other members, check the group's Min slot distance too. See Group settings and Flight limits and separation.
Edit points
You can move, add or delete single drones by hand, for example to clean up one spot on the model.
- Select the Mesh.
- Click Edit points. The button is at the top of the viewport and in the Slots section of the Properties panel. A toolbar replaces the viewport button.
- Choose a mode on the toolbar.
- Press Esc or click the check mark when you finish.
| Toolbar button | What it does |
|---|---|
| Select / move | Click a point, then drag its gizmo. |
| Add points | Each click in the viewport places a new drone. |
| Point count | A read-out, such as 120 pts. |
| Remove | Deletes the selected point. You can also press Delete or Backspace. |
| Done | Leaves edit mode. You can also press Esc. |
A new point does not stick to the model. It lands on a flat sheet facing the camera, so drag its gizmo to fix the depth. See How Add points works.
Adding or deleting a point changes Drone count. After any edit, read Min distance in the Spacing section, because a point you moved or added can sit too close to another.
Moving a point keeps its slot. Deleting one renumbers the slots after it, so a set you made with Pick slots lands on different drones.
A guideline is a saved chain of points. Guidelines are for Point clouds only, so a Mesh has no link or distribute buttons. See Guidelines.
A new sample replaces your edits
Changing Drone count, Size (m), Fill, Up axis, Relaxation or Seed samples the mesh again and replaces your hand edits. So do Try another layout, the Set fixes and Replace mesh…. Undo restores your edits. Settle these settings first, and edit points last.
Fly the mesh
A Mesh does not fly by itself. A Track clip can only fly to a Formation group, so a Mesh must sit in a group.
- Open the Add menu and choose Formation group.
- In the Hierarchy, drag the Mesh onto the group.
- In the timeline, right-click your Launch Pad's Drones track and choose Add Track.
- Drag the group from the Hierarchy onto the clip.
See Formations and groups for how slots are shared inside a group.
Replace the file
Click Replace mesh… to swap the model. Your Drone count, Fill, Relaxation and Seed stay, and clips stay on the element. Up axis follows the new file's type, and Size (m) is worked out again.
If the file is missing
The slots are saved with the show, and the file is kept so you can sample it again. A show still opens, bakes and flies without the file.
If you see The mesh file is not available here, the slots stay as they are but settings have no effect. Upload the file again with Replace mesh… to change them.
Upload errors
| Message | What to do |
|---|---|
Unsupported file type. | Use one of the file types listed above. |
This .gltf keeps its data in separate files. | Export it as a single .glb. |
This glTF uses compression we cannot read. | Export it again with mesh compression turned off. |
The file contains no triangles. | The file holds no solid geometry, only points or curves for example. Export the model as a mesh. |
The mesh contains invalid coordinates. | The file is damaged. Export it again. |
Could not read this file | The file is damaged or is not the type its name says. Export it again. |
Tips
- Settle Drone count, Size (m) and Seed before you use Pick slots on a colour clip. A new sample moves every slot, so a picked set would land on different parts of the model.
- Change the size with Size (m) rather than the Scale gizmo. Size (m) spaces the slots out again. Scale stretches the slots you already have.
- Models with thick, simple forms read best. Fine detail disappears when a model becomes a few hundred lights.
- To use guidelines, turn the Mesh into a point cloud. You lose the link to the file for that copy.
Next
Learn the hand tools in Point clouds.