

Appearance
Viewport and navigation
The viewport is the 3D view of your show. After this page you can move the camera with a mouse or trackpad, use the tools and gizmos, snap to exact views with the ViewCube, and select elements.
Move the camera
| Action | Mouse | Trackpad |
|---|---|---|
| Pan across the ground | Left-drag | Press and drag |
| Orbit around the point under the cursor | Right-drag, or Shift + left-drag | Shift + press and drag |
| Zoom toward the cursor | Scroll wheel | Two-finger scroll, or pinch |
Orbit means circling the camera around a point while looking at it.
These gestures also work when you press on the sky or look almost level across the ground, which is where the show sits in a front view. There, a left-drag slides the camera in the direction you drag, and a right-drag or Shift-drag orbits around the point under the cursor.
Each show remembers its own camera position in your browser, so it opens where you left it.
Tool rail
The four buttons in the top-left corner pick the active tool. The tool rail is hidden during bake playback.
| Tool | Key | What it does |
|---|---|---|
| Hand | H | Camera only, no gizmo. This is the default. |
| Move | G | Move the selection. |
| Rotate | R | Rotate the selection. |
| Scale | S | Resize the selection. |
Gizmos
A gizmo is the set of coloured handles that appears on a selected element when Move, Rotate or Scale is active. Red is the X axis, green is Y and blue is Z.
| Tool | Handles |
|---|---|
| Move | Drag an arrow to move along that axis, or a small square to move on a flat plane. |
| Rotate | Drag a ring to turn around that axis. |
| Scale | Drag a handle to stretch along that axis. |
Press Esc during a drag to cancel it. The top bar's Local and Global buttons set which way the axes point. Center and Pivot set the point that rotation and scaling turn around.
A few things to know:
- With several elements selected in Center mode, the gizmo sits at the centre of the group and they move as one.
- In Pivot mode an amber dot marks the pivot point. Drag the dot to move it. You can also set it in the Transform section.
- A Launch Pad stays flat on the ground: it moves in X and Y, rotates around Z, and scaling it resizes its width and length.
- If a property has keyframes, a drag writes a keyframe at the playhead instead of changing the base value. See Transforms and keyframes.
Keyboard drags
With the pointer over the viewport, G, R and S do more than pick the tool. If something is selected, the drag starts at once and the selection follows your mouse with no button held.
- Select an element.
- Hold the pointer over the viewport and press G.
- Optional: press X, Y or Z to lock the drag to that axis. Press the same key again to release it.
- Optional: press Shift with the axis key to keep the drag on the flat plane across that axis instead.
- Click or press Enter to confirm. Press Esc or right-click to cancel.
A status line at the bottom of the viewport reminds you which keys are active. Pressing G, R or S during a drag cancels it and starts that kind of drag instead.
ViewCube
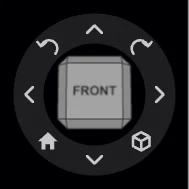
The cube in the top-right corner shows which way you are looking. Click a part of it to swing the camera to that view.
| Click | Result |
|---|---|
| A face | A straight view: FRONT, BACK, LEFT, RIGHT, TOP or BOTTOM. FRONT looks from the audience side. |
| An edge or corner | An angled view between those faces. |
The part under your cursor turns orange before you click. The views follow the show's heading, so FRONT is always the show's face, even if the show is rotated on the map.
The ring around the cube has eight buttons:
| Ring position | Button | What it does |
|---|---|---|
| Top | Orbit up | Turns the view 90 degrees up. |
| Bottom | Orbit down | Turns the view 90 degrees down. |
| Left | Orbit left | Turns the view 90 degrees left. |
| Right | Orbit right | Turns the view 90 degrees right. |
| Top left | Roll left | Tilts the picture 90 degrees. |
| Top right | Roll right | Tilts the picture 90 degrees the other way. |
| Bottom left | Home view | Returns to the home view. |
| Bottom right | Isometric view | Jumps to an angled view from the front, right and top. |
Home view normally puts you 300 m in front of the show, 10 m above the ground, like a person in the crowd. To use your own view, go to Environment, open the Camera section and press Save current view as reset.
Select elements
Click an element's slots to select it. This also works in Wireframe and Drones views, where the slots are not drawn. The status bar names the selection, and the Properties panel and Timeline update to match.
| Action | Result |
|---|---|
| Click a slot | Selects that element only. |
| Cmd (Mac) or Ctrl (Windows) + click | Adds the element to the selection, or removes it. |
| Click empty space | Clears the selection. |
A press that moves more than a few pixels counts as a camera move, not a click. Selection by clicking is off during bake playback. To select something hard to reach, use the Hierarchy panel instead.
Box select
Box selection in the viewport is for picking individual slots. It works only while you pick slots for a clip, for example after you press Pick slots on a colour clip, or while you choose drones to split from a Path. The view switches to Slots while you pick, and goes back afterwards.
| Action | Result |
|---|---|
| Click a slot | Adds or removes that one slot. |
| Shift + drag | Draws a box and adds the slots inside it. |
| Shift + Alt + drag | Draws a box and removes the slots inside it. |
At any other time Shift + drag orbits the camera. To select several clips, use the timeline box. See Colours Manipulator.
Edit buttons
When you select some element types, a button appears at the top of the viewport to edit them point by point: Edit spline, Edit points or Edit SVG. See Splines, Point clouds and Images and SVG.
Tips
- If a tool key seems to do nothing, check that the pointer is over the viewport and that no text field is active.
- Stay on Hand while you look around, so that a stray press cannot move an element.
- Press Home view if you get lost.
Next
Organise your elements in the Hierarchy panel.