

Appearance
Animated paths
On this page you will import a pre-animated flight, where every drone already has its own recorded movement and colour, and place it on your timeline.
A Path element holds animated data for many drones: a position and colour for each one, over time. Use it for motion that is too complex to build from shapes and clips, such as a simulation or a flapping flag made in a 3D tool.
Files you can import
| Type | What to supply |
|---|---|
Alembic (.abc) | One file holding the whole animation as points. It must use the Ogawa storage format. If the file uses the older HDF5 storage, export it again as Ogawa. |
CSV (.csv) | One file per drone. All selected files must be .csv. See below. |
CSV layout
Each CSV file is one drone, with one row per frame. A header row is optional.
uavid,lon,lat,alt,r,g,b,land_flag
7,0.00,0.00,10.00,255,0,0,0
7,0.05,0.00,10.10,255,0,0,0| Column | Meaning |
|---|---|
uavid | Ignored. The drone number comes from the first number in the file name, so drone-7.csv is drone 7. |
lon | East position in local metres, not a longitude. |
lat | North position in local metres, not a latitude. |
alt | Up position in local metres. |
r, g, b | Colour, 0 to 255. A missing value becomes 255. |
land_flag | Ignored. |
A CSV file has no frame rate of its own, so you set it during import.
Import the data
Your show must be saved first. If it is not, the app asks you to open a saved project.
- Open the Add menu and choose Path.
- With the Path selected, click Import data in the Properties panel. The Import drone data dialog opens.
- For CSV files, set CSV frame rate first. It defaults to 30 and accepts 1 to 240.
- Choose your file or files. For CSV, select every drone's file at once. The dialog shows the upload and processing progress.
- Check the 3D preview. Use the play button and drag inside the lit part of the crop bar to scrub.
- Drag the two ends of the crop bar to keep only the part you want. Press the left or right arrow key to nudge the last end you used by one frame.
- Set the options below.
- Click Apply.
| Option | What it does | Default |
|---|---|---|
| Center formation | Centres the animation on the Path's origin when you apply. | On |
| Auto center | Turns Center formation on. | |
| Output FPS | How many frames per second are read from the file, from 1 to 120. A Path always plays at 30 frames per second, whatever you choose. | 30 |
If the file cannot be read, the dialog shows an error. Check that the file matches the layouts above.
Path settings
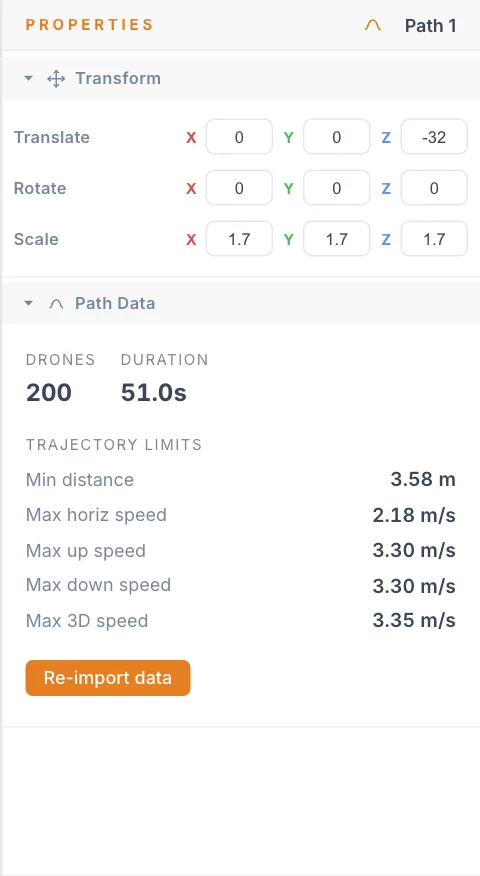
| Setting | What it does | Default |
|---|---|---|
| Drones | A read-out of the number of drones in the data. | 0 |
| Duration | A read-out of the animation's length. | 0.0s |
| Import data | Opens the import dialog. It reads Re-import data once a Path has data, and a new import replaces the old one. |
After the Path is saved, a Trajectory limits block shows what the animation demands:
| Read-out | Unit |
|---|---|
| Min distance | m |
| Max horiz speed | m/s |
| Max up speed | m/s |
| Max down speed | m/s |
| Max 3D speed | m/s |
Compare these with the limits on your Launch Pad. Scaling a Path makes its speeds and distances different from these figures, so run the safety checks after you bake.
Place it on the timeline
Each Path has a Waypoints track with one Playback clip. Its length comes from the data, so you cannot resize it by dragging an edge.
The clip starts locked. To move it:
- Right-click the clip and choose Unlock.
- Drag it to the time the motion should begin.
To fly it, put the Path in a Formation group and assign that group to a Track clip. If the group holds one Path and that Path's clip is still at the start of the timeline, the app moves the clip to 10 seconds after the Track clip's start, so the drones have time to arrive.
Before and after its clip, a Path holds its first and last frame.
Routing and exact motion
Routing normally keeps drones within your limits, and that can change a figure. To play a Path exactly as authored over a time window, add an Algorithm Bypass clip.
Edit the animation
Select the Playback clip to see the Path Playback section.
These tools rewrite the path
Trim path…, Retime path…, Split path…, Split drones… and Repeat all change the data for good. The app asks you to confirm first. Cmd Z / Ctrl Z brings the old data back until you reload the page, so keep your source file.
| Tool | What it does |
|---|---|
| Trim path… | Drag the handles on the clip to keep the middle, then confirm with Trim. The rest is removed. |
| Retime path… | Drag the clip's end handle. Longer is slower, shorter is faster. Frames are interpolated. Confirm with Retime. |
| Split path… | Cuts the animation into two Path elements at a point on the clip. Playback stays seamless. |
| Split drones… | Pick drones in the viewport with a click or Shift+drag box, and move them to a new Path. Playback stays the same. |
| Repeat | Plays the motion reversed, then forward, the number of extra times you set from 1× to 20×. There is no jump, so a short loop plays longer. |
Retime path… is useful after you scale a Path up, to bring its speeds back down.
Tips
- Export your animation at the size it will fly. Scaling afterwards changes every speed.
- Trim the data in the import dialog when you can. That step does not touch your source file.
- A Path counts as slots like any shape, so its drone count should match the drones flying to the group.
Next
Add your music with Audio.