

Appearance
Show and Environment
On this page you will place your show at a real location, turn it to face the audience, set up a colour palette for the project, and choose what the viewport shows around your design.
Two things hold show-wide settings:
- The Show element is listed in the Hierarchy panel. It contains your shapes, text, paths and groups.
- The Environment is opened with the Environment icon near the right of the top bar. It is not listed in the Hierarchy. Click the icon again to close it.
Selecting either one fills the Properties panel.
The Show element
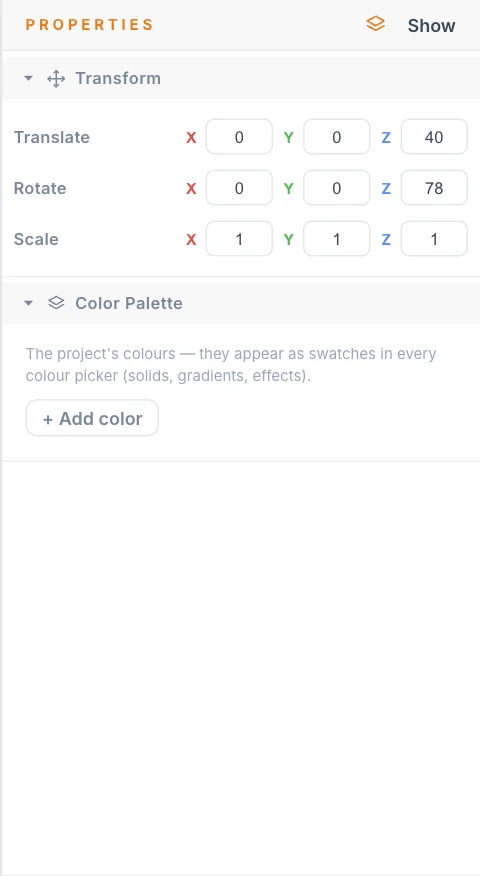
Transform and heading
The Show transform moves the whole show as one piece. Every element inside the Show follows it.
| Setting | What it does | Default |
|---|---|---|
| Translate | Moves the whole show, in metres, along X (east), Y (north) and Z (up). | 0, 0, 0 |
| Rotate | Turns the whole show, in degrees. Z is the show heading: the compass direction the show faces. | 0, 0, 0 |
| Scale | Resizes the whole show. 1 is full size. | 1, 1, 1 |
Design at heading 0 and turn the show last. To face a crowd that stands to the south-east, for example, you only change Rotate Z, and every element keeps its position relative to the others.
Launch pads stay put
A Launch Pad sits outside the Show, so the Show transform does not move or turn it. If you shift the show, check that your Launch Pad is still where the real launch site is.
You can animate the Show transform with keyframes, the same as any element. See Transforms and keyframes.
To hide all show content at once, right-click Show in the Hierarchy and choose Hide. Use Show in the same menu to bring it back.
Colour palette
The Color Palette section is a list of named colours for this project, such as your client's brand colours. Each one appears as a swatch in every colour picker: solid clips, gradient stops and effects. This keeps the same colours in use across the whole show.
The list starts empty.
- Click + Add color. A white row named after its position appears, for example
Color 1. - Click the colour square and choose a colour.
- Type a name in the name box.
- To remove a row, click its ✕. Clearing the colour in the picker also removes the row.
The palette is a design aid. Changing a palette colour later does not repaint clips that already use that colour.
The Environment
Location
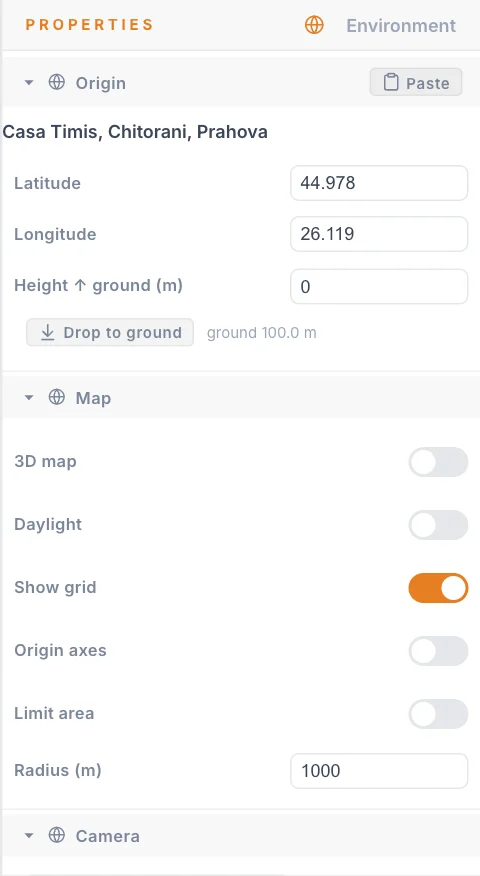
The origin is the point on Earth where your design's 0, 0, 0 sits. Every position in the show is measured in metres from it. Set the origin to the middle of your real show area.
You can enter an origin in the new-show dialog or leave it empty and set it here later. All of these settings are in the Origin section, under the Location name you gave the show, if any.
| Setting | What it does | Default |
|---|---|---|
| Latitude | North-south position in decimal degrees, from -90 to 90. | 44.4273489 |
| Longitude | East-west position in decimal degrees, from -180 to 180. | 26.0862713 |
| Height ↑ ground (m) | How many metres above the sampled ground the origin sits. | 0 |
To paste coordinates instead of typing them:
- Copy the coordinates. Degrees, minutes and seconds (
44°25'38.7"N 26°05'20.4"E) and a decimal pair (44.427420, 26.088995) both work. - Click Paste in the header of the Origin section. The browser may ask for permission to read the clipboard.
If the clipboard holds nothing usable, the app tells you and leaves the origin as it was.
Ground height
The ground height is the elevation of the real ground under your origin. The small read-out next to the button shows it, for example ground 100.0 m.
- Turn on 3D map. See 3D map.
- Wait for the map to appear under the origin.
- Click Drop to ground. The show now sits on the map surface, plus whatever you set in Height ↑ ground (m).
If the map is off or still loading, the app warns you and nothing changes.
Buildings count as ground
The 3D map is a single surface. If your origin is over a building, Drop to ground gives you the rooftop, not the street. Move the origin to open ground, drop, then check the result by orbiting the view.
Map, daylight, grid and axes
These switches are in the Map section.
| Setting | What it does | Default |
|---|---|---|
| 3D map | On shows a 3D model of the real place. Off shows a flat satellite picture. See 3D map. | Off |
| Daylight | On previews a day show: real sky, sun and a fully bright map. Off is the night look: black sky, dimmable map, glowing drones. | Off |
| Show grid | Draws a reference grid at origin level, with 10 m cells. | Off |
| Origin axes | Draws arrows at the origin: X east in red, Y north in green, Z up in blue. They turn with the show heading. | On |
| Limit area | Loads the 3D map only near the origin. See 3D map. | On |
| Radius (m) | The size of the loaded map area, the flat map and the grid. Minimum 10, steps of 50. | 200 |
With Daylight off, the Time of day slider in the viewport settings dims the map. With Daylight on, the map stays at full brightness. For planning a day show, see Daytime shows.
Reset camera
The home button on the ring of the view cube returns the camera to a reset view. By default that view is a crowd-eye framing of the show. You can save your own.
- Move the camera to the view you want to come back to.
- Click Save current view as reset in the Camera section. The status line changes from
Using default reset viewtoCustom reset view saved. - To go back to the crowd-eye framing, click Use default. This button appears only when a custom view is saved.
The saved view is stored with the show, so everyone who opens the show gets it.
Tips
- Set the location before you build. The origin decides where everything lands, including the map under your design.
- Turn on Show grid when you judge sizes. Each cell is 10 m by 10 m.
- Save a reset view from where the audience will stand. It gives you one click back to the view that matters.
Next
Bring the real place into the viewport with the 3D map, then set up your Launch Pad.