

Appearance
Create your first show
In this tutorial you take a new show from an empty dashboard to a finished video. You add the word HELLO to a ready-made show, light it, check it, bake it and render it. Follow the stages in order, and use the exact values given. They were chosen to pass the safety checks with the starter fleet.
1. Create the show
- On the Shows dashboard, click New show.
- In Title, type
My First Show. - Click Create show. Leave the other fields as they are.
- The show's page opens on the Editor tab. Click Open editor.
The editor opens with a starter: a small complete show, so you begin with something that already flies. More about the dialog in The Shows dashboard.
2. Look around
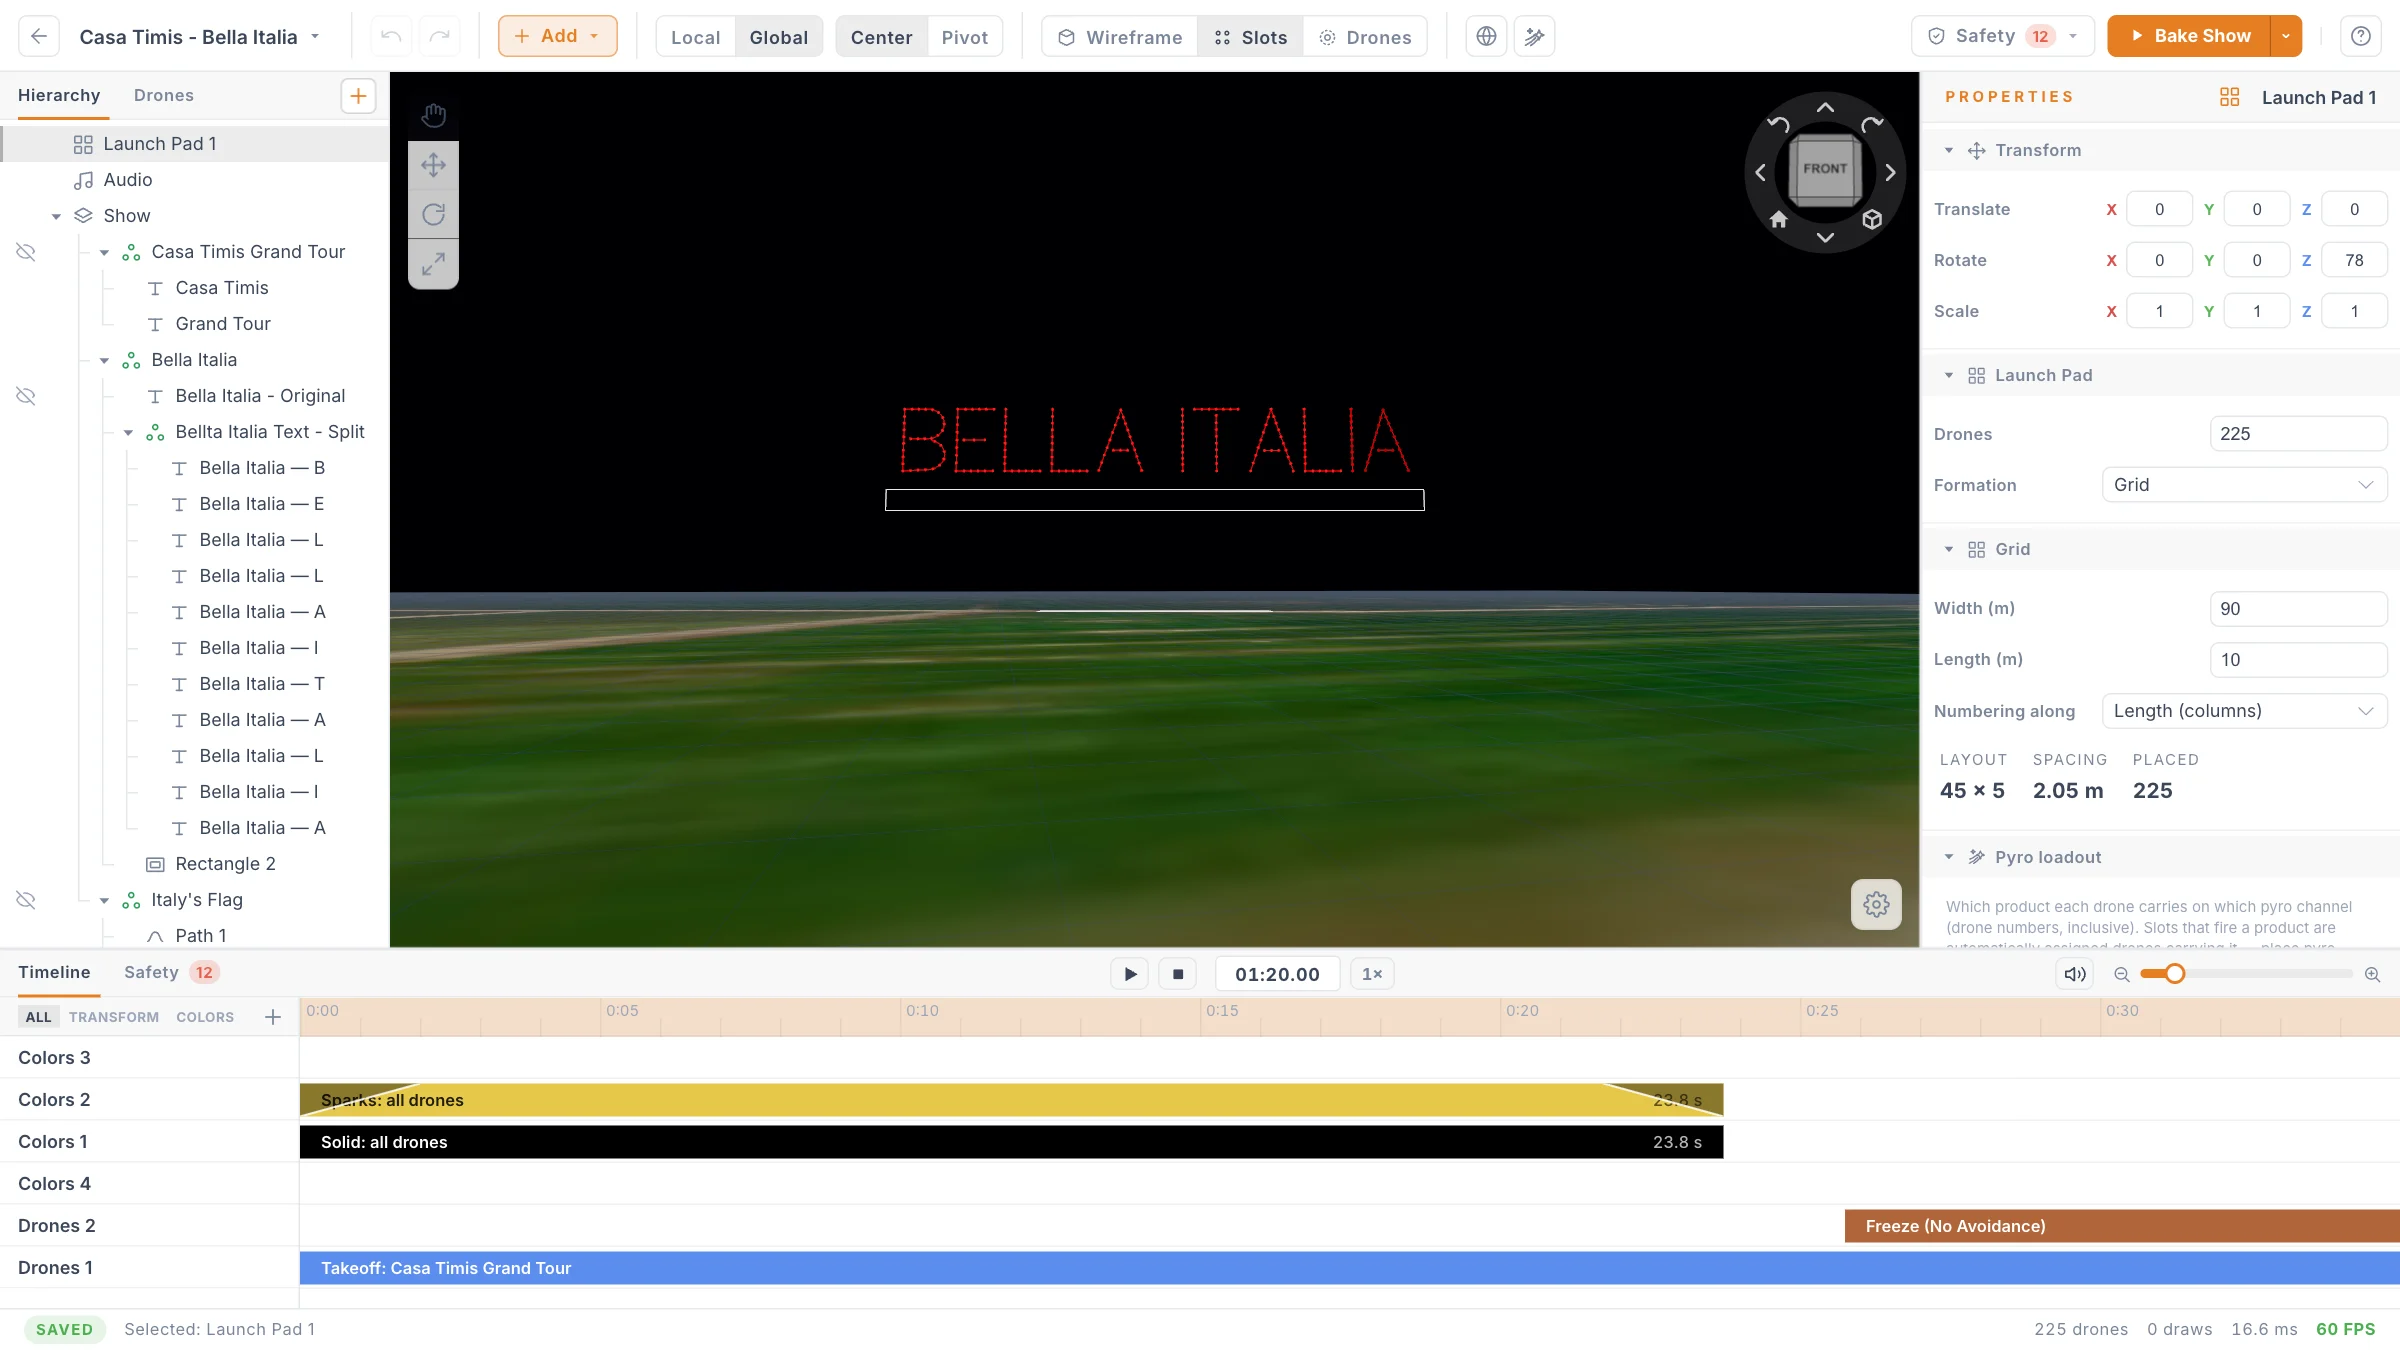
| Area | What it does |
|---|---|
| Top bar | Add elements, change the view, run Safety and Bake |
| Hierarchy (left) | The list of everything in your show. Click a row to select it |
| Viewport (centre) | The 3D view of your show |
| Properties (right) | The settings of whatever is selected |
| Timeline (bottom) | When things happen. It shows the selected element's channels |
The Hierarchy lists what the starter contains. These sizes are for 100 drones. A different number in the New show dialog gives a matching starter.
| Element | What it is |
|---|---|
| Launch Pad 1 | 100 drones in a 10 by 10 grid on a 40 by 40 m pad |
| Circle Formation | Circle 1: an upright circle of 100 slots, radius 40 m, centred 50 m up. A Spin clip on its Effects channel turns it once |
| Helix Formation | Helix 1: a spiral of 100 slots |
A slot is one point of a shape that a drone will fly to. A formation group is a folder of shapes that the drones treat as one picture.
Now move the camera:
- Pan: drag with the left mouse button.
- Orbit: drag with the right mouse button, or hold Shift and drag with the left.
- Zoom: turn the mouse wheel.
The cube at the top right of the viewport is the ViewCube. Click its FRONT face to look at the show from the audience side. Click a corner or an edge for other views. The ring around the cube has a home button that resets the camera, which is useful if you get lost.
More in Viewport and navigation.
3. Play the timeline
- In the top bar, click Drones. This view shows the simulated fleet. Slots shows the design points instead, and Wireframe shows outlines only.
- In the Hierarchy, click Launch Pad 1. The timeline now shows its Drones 1 row.
- Press Space to play, and press it again to pause.
- Drag the orange playhead along the ruler to move through the show by hand. This is called scrubbing.
The Drones 1 row holds the whole flight:
| Time | Clip | What the drones do |
|---|---|---|
| 0 to 40 s | Takeoff: Circle Formation | Fly from the pad to the circle |
| 45 to 80 s | Track: Helix Formation | Fly from the circle to the helix |
| 85 to 115 s | Return | Fly back to their pad spots |
Between two clips, the drones hold still.
Two things are normal at this stage. The drones are dark, because they only light up when a colour clip tells them to. They also fly straight lines through each other, because this is a quick preview. The real routes come from the bake in stage 9.
Undo is one key away
Press Cmd Z (Ctrl Z on Windows) or click the left arrow in the top bar to take back a change. Your changes save automatically. The status bar at the bottom shows Saved when your work has reached the server.
4. Add the text
- In the top bar, click Slots so you can see design points.
- Click Add, or press Shift + A.
- Under Shapes, choose Text. Text 1 appears in the Hierarchy, already selected.
- In Properties, find the Text section. In Content, type
HELLO. - Set Font size (m) to
25. - In the Slots section, set Drones to
100.
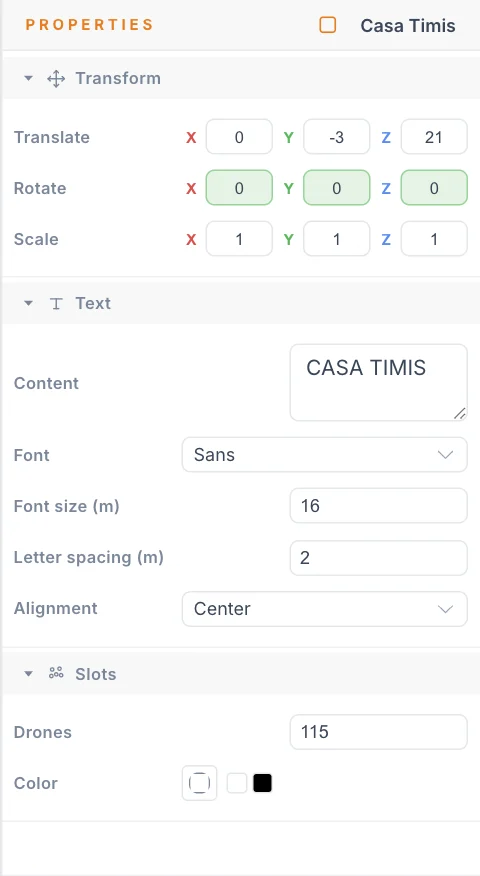
Why these values:
- Drones is
100because the fleet has 100 drones. Text starts at 120 slots, which would leave 20 slots empty. - Font size (m) is
25so the drones are far enough apart. With 100 drones, HELLO at 25 m puts the closest drones about 2.6 m apart. Your limit is 2 m. At the default 10 m they would be about 1 m apart, which is too close.
The word now sits at ground level, half below the origin. You fix that in the next stage. More options, such as fonts, are in Text and fonts.
5. Make it a formation
Drones can only fly to a formation group, so the text needs one. You also need to lift it into the sky.
- Click Add. Under Structure, choose Formation group. A new group appears under Show and is selected.
- At the top of Properties, click the group's name, type
Text Formation, and press Enter. - In the Hierarchy, drag Text 1 onto the middle of the Text Formation row. The row highlights, and Text 1 moves inside it.
- Click Text Formation.
- In the Transform section, find the Translate row. Set Y to
-30and Z to50.
Z is height, so the middle of the word is now 50 m up. Y moves it 30 m toward the audience, in front of the circle and the helix, so the formations do not overlap.
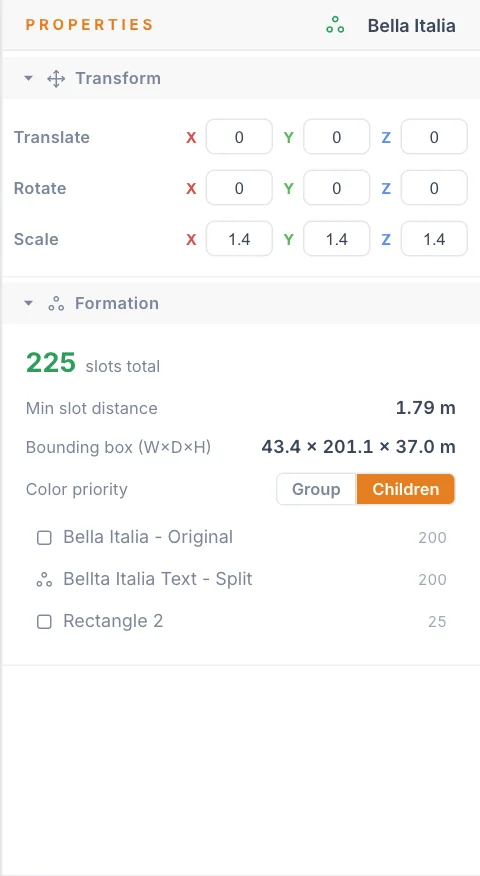
Check the Formation section. It should read 100 slots total.
6. Send the drones there
The Text Formation goes between the helix and the return home. To make room, you move Return later, then add a Track clip.
- In the Hierarchy, click Launch Pad 1.
- Use the zoom slider at the right end of the timeline's tab row until you can see about 160 seconds. You can also hold Ctrl or ⌘ and turn the wheel over the timeline.
- Drag the Return clip to the right until it starts at 125 s. A label beside the pointer shows the exact time.
- Right-click the empty part of the Drones 1 row, right after the helix clip (near 85 s), and choose Add Track. A short clip appears.
- Drag the right edge of the new clip until it ends at 120 s.
- Drag Text Formation from the Hierarchy and drop it on the new clip. The clip's title changes to Track: Text Formation.
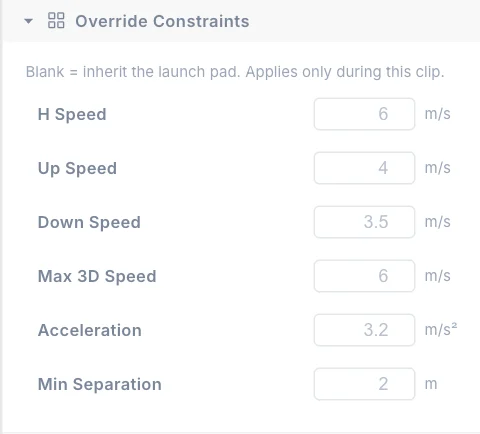
The clip's length matters. The drones must cover the distance within your flight limits. The default horizontal speed limit is 5 m/s, so a 60 m move takes at least 12 seconds. This 35 second clip gives them plenty of time.
Click Drones in the top bar and scrub to about 110 s. The drones now spell HELLO, still dark. More in Drone events.
7. Colour it
- In the Hierarchy, click Text Formation.
- In the timeline, click the + button beside All, Transform and Colors, then choose Colors. A row called Colors 1 appears.
- Right-click that row near 85 s and choose Add Solid.
- Click the new clip. Properties now shows a Solid (Colors) section.
- Click Color and choose a colour. It starts as white.
- Drag the clip's edges so it runs from 85 s to 120 s.
- Optional: set Fade in (s) to
2for a soft start.
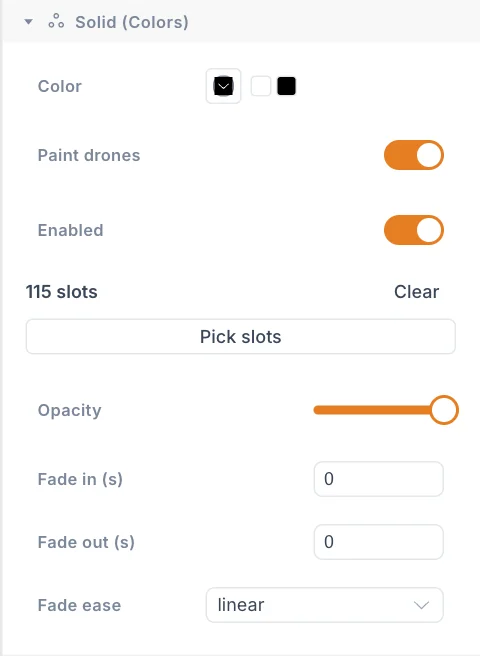
Scrub through 85 to 120 s to see the word light up.
A colour clip paints only while it is active. If it is still active when the Track clip ends, as here, the drones keep that colour while they hold and fly home. If it ended earlier, the word would go dark before the Track clip finished.
The circle and helix are still dark. To light them, repeat these steps on Circle Formation and Helix Formation, with clips that match their times. More in Colours.
8. Run the safety check
The app compares your design with the flight limits on the Launch Pad, live, while you work.
- Look at Safety in the top bar. A green tick means nothing is wrong. A number means that many rows need attention. Amber means a value is past its limit by up to 10%, and red means it is more than 10% past.
- Click Safety to see the worst rows.
- Click See all → Safety tab to open the full table.

Each row is one measurement. With the values in this tutorial you should see a green tick, with Text 1 at about 2.6 m against a limit of 2 m.
If a row is red or amber, click Jump to move the playhead to that moment, fix the cause, and wait for the check to run again. You can also click Recheck.
What Whole show measures
The Whole show row finds the closest pair across the formations drones are on at each moment. A formation counts from the start of its Track clip until the pad moves on. Formations you fly one after another never count together, so they can share the same airspace.
These numbers are estimates, and the strip above the table says so. After you bake, the same tab shows the real numbers. More in Safety checks.
9. Bake and watch
Baking calculates the real path of every drone for the whole show, on our servers.
- Click Bake Show in the top bar. Your latest changes save first, then the button shows Baking… with a percentage, followed by Loading….
- When it finishes, the editor enters Bake mode. A banner above the viewport reads Simulated bake v1, and the view switches to Drones.
- Click the square Stop button above the timeline to rewind, then press Space.
You are now watching the routed flight. Bake mode is read-only, so the tools and the Add button are gone, and the right panel shows Statistics:
- Realtime gives the values at the playhead.
- Overall gives the extremes of the whole show. Click a row to jump to that moment.
Check Min Distance under Overall. It tells you how close any two drones came. Then open the Checks tab beside Timeline to see charts of distance, speed, acceleration and altitude over the whole show.
To change something, click Exit, make your edit, and click Bake Show again. That gives you v2. Your old bakes stay in the list under the arrow beside Bake Show.
If a bake fails, a message stays on screen with the reason. More in Baking and playback.
10. Render a video
You need a baked show, and Chrome or Edge. See Requirements.
- While still in Bake mode, frame the show in the viewport. Click FRONT on the ViewCube, then zoom until HELLO fits. The camera stays exactly here for the whole video.
- Click the show's name at the left of the top bar.
- Under Export · bake v1, choose Render video….
- Check the options in the Export video dialog.
- Click Export.
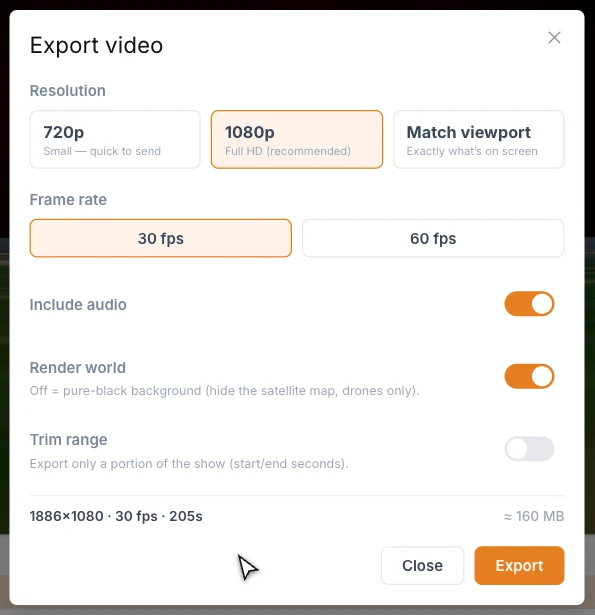
| Setting | What it does | Good starting value |
|---|---|---|
| Resolution | 720p, 1080p or Match viewport | 1080p |
| Frame rate | 30 fps or 60 fps | 30 fps |
| Include audio | Adds the soundtrack, if the show has one | On when available |
| Render world | Off gives a pure black background with drones only | On |
| Trim range | Exports only part of the show | Off |
The dialog shrinks to a small progress card, so you can watch the render in the viewport. Cancel stops it. When it reaches 100%, your browser downloads an .mp4 file with the bake version in its name. More in Render a video.
What you did
You worked through the whole cycle: shape, formation, Track clip, colour, safety check, bake, video. Real shows repeat these same steps with more formations and more time.
Tips
- Keep your own values for a while, then change one thing at a time and watch the Safety button.
- Most new shapes start with one slot per drone in your fleet. Text always starts at 120.
- If you want more or fewer drones, change Drones on Launch Pad 1, then match each formation to it.
- The starter is made of ordinary elements. Rename them or delete them when you no longer need them.
Next
Learn the tools properly in the Interface tour, or make the show your own with Formations and groups and Designing good shows. When you are ready to fly, go to Export FSP flight files.