

Appearance
Tips and tricks
These tips make everyday work faster and safer. Each one describes how the app behaves today, so you can try it as you read. For the full key list, open Help and choose Keyboard shortcuts.
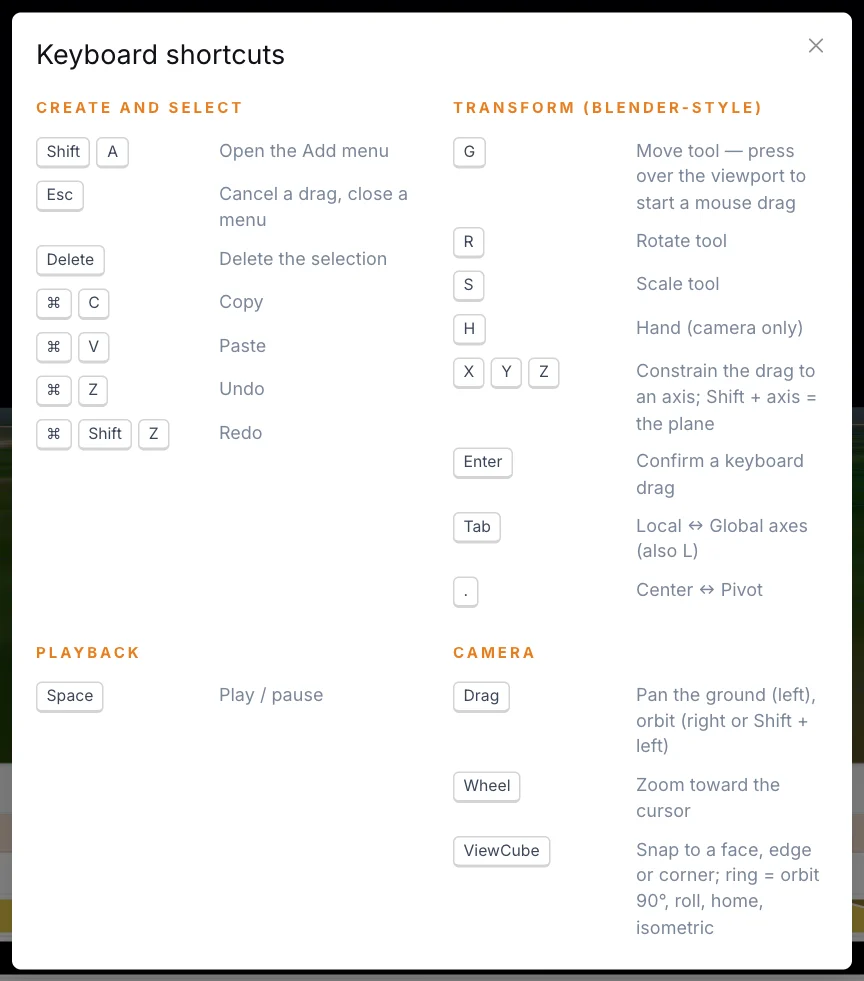
On a Mac, read Ctrl as Cmd.
Speed
- Add from the keyboard. Press Shift+A, type a few letters, then press Enter.
spthen Enter adds a Spline, because the first result is already selected. Arrow keys move through the list. This works while you edit, not during bake playback. - Search in plain words. The Add menu knows other names:
discfinds Fill circle,musicfinds Audio,logofinds Import SVG / image…. - Use the Recent row. The Add menu remembers what you last added in this project.
- Press G, R or S to start at once. With something selected and the pointer over the viewport, the key starts a mouse-driven move, rotate or scale. There is no handle to grab.
- Lock a drag to an axis. During that drag press X, Y or Z. Shift plus the key locks to a plane. Press the same key again to release it. Click or press Enter to confirm. Press Esc or right-click to cancel.
- Change your mind mid-drag. Pressing R during a move cancels the move and starts a rotate.
- Press H for camera only. The Hand tool lets you drag around the scene without moving anything.
- Flip the transform modes. Tab or L swaps Local and Global axes. The
.key swaps Center and Pivot. - Type a time. Click the timecode, type
1:27,1:27.15or87, then press Enter. - Review faster. The speed button beside the timecode cycles through 1×, 2× and 5×.
- Save now. Ctrl+S saves straight away. The app also saves by itself as you work.
Selection
- Select many in the Hierarchy. Ctrl-click adds a row. Shift-click selects a range. Ctrl+A selects every row while the pointer is over the list.
- Add in the viewport too. Ctrl-click a slot to add its element to the selection.
- Right-click inside a selection. Right-clicking a selected row keeps the selection. Right-clicking an unselected row selects that row alone.
- Pick slots quickly. After Pick slots, click a slot to toggle it, Shift+drag a box to add many, and Alt+drag a box to remove them. Clear empties the list.
- Set a reveal order by clicking. A Reveal in By selection order mode follows the order you picked the slots, so you can light a shape one drone at a time.
- Select clips in bulk. Shift-click adds a clip. Dragging on an empty part of a lane draws a box around clips and keyframes. Hold Shift to start a box on top of a clip.
- Filter the lanes. Use All, Transform and Colors beside the channel list to hide what you are not working on.
Timeline
- Zoom around the playhead. Ctrl+wheel, a trackpad pinch or the zoom slider all keep the playhead centred.
- Move by exact steps. Left and Right arrows step one frame. Shift+Left and Shift+Right jump to whole seconds. Home goes to the start and End goes to the end of the show.
- Jump between keyframes. K goes to the next one and Shift+K to the previous one, on the transform channels you can see.
- Scrub freely. The playhead follows your cursor exactly, so dragging it plays the animation smoothly at your own pace. Use K and Shift+K when you need to land exactly on a keyframe.
- Trust clip snapping. A dragged clip edge snaps to other clips, keyframes and the playhead within 8 pixels. Away from those it snaps to a 0.25 s grid.
- Move a block. With several clips selected, dragging one moves them all by the same amount. Dragging an edge resizes them all on that side.
- Copy a clip. Right-click it and choose Copy, then right-click a lane and choose Paste event. It lands at that spot or in the next free gap. A pasted colour clip covers every slot of its new element, so pick slots again if you need a subset.
- Send a clip to another lane. Drag it to a channel of the same type, or right-click it and use Move to.
- Compare with and without. Right-click a clip or channel name and choose Disable. Lock protects it from edits.
- Name your channels. Double-click a channel name to rename it. With ten colour channels, this saves time.
- Hide a group, keep the flight. Hiding a whole formation group clears the view and the Track still flies to it. Hiding an element inside a group removes its slots from that picture.
- Let paths place themselves. When you assign a group holding one Path to a Track clip, and the Playback clip is still at 0, it moves to 10 s after the Track start.
Colour
- Expect darkness. New shapes have a black basic colour, which means LEDs off. Only colour clips light drones. Because of this, a new Solid on black slots starts white.
- Lay a black base. A black Solid on a group, with Color priority set to Children, lets each child fade in from black. See the night show.
- Top lane wins. When colour channels overlap, the top lane paints last. Right-click a channel name and use Move up (front) or Move down (back).
- Paint across formations from the pad. Colour clips on the Launch Pad apply to every drone, paint over formation colours, and carry across Track clips.
- Build a palette. Turn off Paint drones on a Solid or Gradient. It paints nothing alone but stays available under Colour sources on an effect.
- Know what an empty Reveal does. With no colour source ticked, an effect only dims the colours beneath it. Tick a source to paint that colour instead.
- Control the wipe. Sweep time (s) sets how long a Reveal wipe takes. After it, the colour holds until the clip ends. 0 uses the whole clip.
- Calm your sparks. The defaults are Rate (/s) 3 and Amount 0.15. Try 1 and 0.1 for a gentle twinkle. Change Seed for a different pattern.
Safety
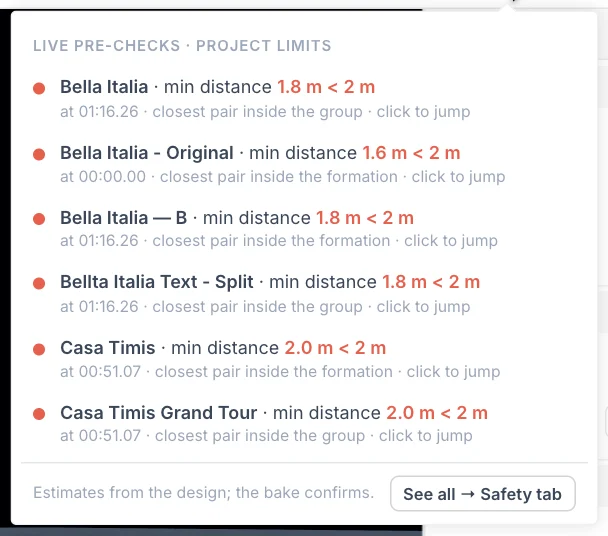
- Glance at the Safety button. Green means every value is within its limit. Amber means a value is past a limit by up to 10%. Red means more than 10% past.
- Click a row in the Safety menu. It moves the playhead to the moment and selects the element. See all opens the Safety tab, and Edit limits… there takes you to the Launch Pad, where limits live.
- Treat those numbers as estimates. They come from the design. The bake is the authority, so check again in Safety checks.
- Read a group's numbers. Select a formation group to see slots total, Min slot distance and its Bounding box (W×D×H).
- Keep what you can in a bypass. In an Algorithm Bypass clip, uncheck any limit you still want enforced. Night show example: Acceleration stayed on.
- Override one clip only. Takeoff, Track and Return clips have their own limits. Leave a field blank to inherit from the pad.
- Undo a whole drag at once. Cmd Z (Ctrl Z) takes back one change, and a full drag counts as one change. Undo reaches back 100 steps and resets when you reload. For a version you want to keep, right-click and choose Duplicate, then hide the original.
Baking
- Bake without saving first. Bake Show saves your edits, and stops if that save fails, so a bake always matches your latest work.
- Stay at the moment you care about. Baking pauses the playhead and keeps it where it was, so you land on that moment when the bake finishes.
- Return to older bakes. The caret beside the Bake button lists the last 10 versions, with More… for the rest.
- Remember playback is read-only. While a bake is loaded you cannot add or move anything. Exit from the banner to go back to editing.
- Find the worst moment. In Statistics, click any Overall row to jump to that moment.
- Click a chart. In the Checks tab, clicking any chart moves the playhead to that time.
Rendering
- Frame first. A video uses your current camera, so set the view before you open the dialog.
- Save your framing. In the Environment settings, Save current view as reset stores the view, and the home button on the ViewCube ring returns to it.
- Choose a size. 720p is quick to send, 1080p is the recommended choice, and Match viewport gives exactly what is on screen.
- Render on black. Turn off Render world to hide the map and show only the drones.
- Export a highlight. Turn on Trim range and enter start and end seconds.
- Unmute before rendering. If audio is muted in the timeline, Include audio is unavailable.
See Render a video for the whole dialog.
Next
Read Designing good shows, or look up a term in the Glossary.